BitRaser Wipe
Updated
by Shannon Obanion
BitRaser Cloud Variant Wipe
Not sure which version to use:
BitRaser Helpful hints -
Cloud version -
- You can power on the device, or if you can't power on, you can pull the HD and use an external bay to wipe from another device.
- Download .iso from the BitRaser site and put it on a bootable thumb drive - See Helpdocs for specifics.
- (See Eltina for custom .iso per individual tech)
Offline Version
- Can't connect to the internet or
- Can't pull the HD
- You must use the 2 thumb drives provided by BitRaser company.
- Only 5 licenses per set. More must be ordered from Bitraser if all are used or lost.
- Prepare BitRaser USB:
- Download the BitRaser software (See Eltina for custom .iso) and create a bootable USB if you haven't already. Use Bit Raser's tool or third-party software to create the bootable drive.
- Settings to use for creating the USB.


- Connect the Bootable BitRaser Drive:
- Insert the BitRaser bootable USB into the device you want to wipe. Ensure that no other important devices are connected to avoid accidental data wiping.
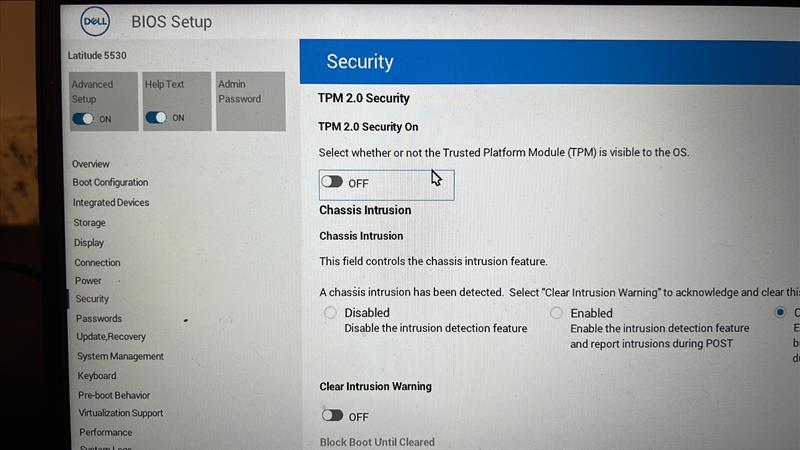
- Boot into BIOS (F2 when your PC starts)
- Navigate to the "Security" tab, and turn TPM 2.0 off. Click "OK" on the confirmation dialog.

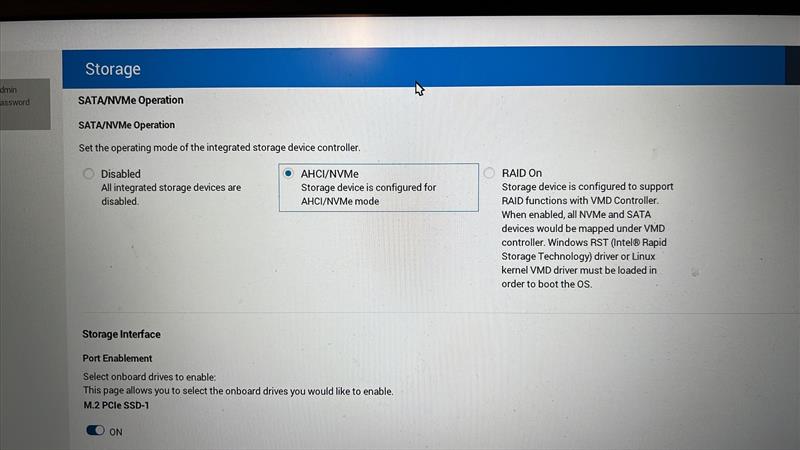
- Navigate to the "Storage" tab, and switch the RAID setting to AHCI/NVMe. Click "OK" on the confirmation dialog.

- Boot from the BitRaser Media:
- Restart the target device and access the boot menu (usually by pressing
F12,Esc, orF2, depending on your device’s BIOS/UEFI). - If using an external drive to wipe a hard drive. Make sure it is plugged into the host device and not in the initial boot order.
- Select the USB as the boot device to load BitRaser.
If the device has Safe Boot enabled, disable it.
- Restart the target device and access the boot menu (usually by pressing
- Launch BitRaser and Select Drive:
- Once BitRaser loads, accept the license agreement and proceed to the main menu.
- From the main interface, select the drive(s) you want to wipe. The process is irreversible, so be careful to choose only the correct drive(s).
- Choose Wiping Standard:
- Select the data-wiping standard you want to use. We use NIST 800-88 Purge

- Select the data-wiping standard you want to use. We use NIST 800-88 Purge
- Chose the tab "Erasure Details"
Fill in the machine name and Serial # as shown below.


- Start the Wipe Process:
- After selecting the wiping standard, confirm that you will start the wiping process. BitRaser will overwrite data on the selected drive according to the chosen standard.
- The time required depends on the drive size and wiping standard.
- Save or Print Wiping Report:
- After wiping, BitRaser generates a report that provides proof of erasure.
- If you are using a Cloud Variant Wipe, the report will upload automatically to BitRaser
- You can also save this report as a PDF and save it to the USB into a folder you will create called "Certificates".It should be saved to the cloud; this is just a backup.
- Go to the Reports Tab for these options

- Remove the BitRaser Bootable Media:
- Once the wipe is complete, remove the BitRaser USB, and reboot the system. The device will now be wiped clean and have no operating system or data.
